Imagine a high school marching band at halftime. The drummer vanishes. Suddenly, the trumpets are rushing, the cymbals are clashing in chaos, and the saxophonist is just walking off the field. The music doesn’t just stop; it collapses.
Your car’s engine runs on that same principle of coordinated chaos. If the timing belt fails, the engine doesn’t just stumble. It seizes.
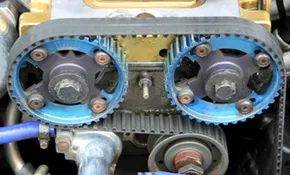
Think of the timing belt as the drum major. It is a reinforced strip of synthetic rubber, laced with fiber cords, sitting in the front of your engine. Its job is singular and brutal: keep the crankshaft and camshaft in perfect lockstep.
Зміст
The Mechanics of Sync
Why does a piece of rubber matter so much? Because of physics.
The crankshaft takes the linear, up-and-down energy from the pistons and converts it into rotational energy. That’s what turns your wheels. The camshaft, meanwhile, is the gatekeeper. It opens and closes the valves to let air and fuel in, then exhaust out.
The timing belt links these two components.
When the belt is fresh, the pistons and valves dance. They pass each other in the cylinder head with millimeters of clearance, never touching. When the belt slips, stretches, or snaps, that dance turns into a collision. Pistons slam into open valves. Springs break. Heads warp. The result is catastrophic engine damage that usually means a rebuild or a replacement.
The Replacement Window
You don’t get a warning light for a failing timing belt. It’s buried under covers and shields, hidden from view. You have to guess based on mileage and time.
Traditional guidance says replace it every four years or 60,000 miles (96,561 kilometers). Newer vehicles with better materials might stretch that to 100,000 miles (160,934 kilometers).
Check your owner’s manual. Manufacturers know best. But even if you drive 500 miles a year, that rubber degrades. Heat, oil exposure, and age turn flexible cords into brittle dust. When it goes, it goes hard.
Taking Control
Panic isn’t required. You don’t need to live in fear of a sudden bill. You just need to act like a band director. Watch the wear. Know the schedule. Arm yourself with the right tools.
Replacing a timing belt is a significant job. It’s not a quick oil change. But it’s manageable if you prepare. We’ll cover the specific tools you need, how to spot the early signs of belt wear, and the step-by-step process to get the job done without stripping a bolt or bending a valve.
Tools Needed for a Timing Belt Replacement
Most drivers ignore their timing belt until the mileage counter ticks past 60,000 or 100,000 miles. Don’t assume you’re safe just because you haven’t hit that threshold yet. If you’re already under the hood for other work, inspect the belt. Look for cracks, shredding edges, or excessive slack. These are early warnings.
The engine bay is a hostile environment. Temperatures can exceed 500 degrees Fahrenheit. That heat bakes rubber. Add external stressors to the mix, and your replacement window shrinks.
Factors That Accelerate Belt Wear
Your driving habits and local climate dictate how fast your belt degrades. A standard interval might not apply to you. Consider these accelerants:
- Oil leaks: Seals around the belt can leak oil. Oil breaks down rubber compounds, leading to corrosion and premature failure.
- Dry climates: Low humidity and high heat cause belts to dry out, become brittle, and snap without warning.
- Infrequent driving: Cars that sit for long periods cause the belt to take a “set.” This deformation weakens the material over time.
If you live in one of these conditions, tighten your maintenance schedule. You will likely replace the belt more than once during the vehicle’s life.
Essential Tools for the Job
Before you start turning wrenches, gather the right equipment. If you’re a DIYer, you probably have the basics. Here is what you need for a standard timing belt replacement:
- Socket set
- Torque wrench
- Combination wrenches
- Screwdrivers
- Drain pan
- Antifreeze
- Jack and jack stands
But tools alone aren’t enough. You need specific materials:
- New timing belt
- Timing light
- Timing belt cover gasket set
- Belt tension gauge
- Camshaft holding bolts or pins
Some vehicles require special extraction tools. You might need a harmonic balancer puller or a three-jaw gear puller to remove the crankshaft pulley if it doesn’t slide off easily.
One size does not fit all. Procedures and belt types vary wildly by make and model. Your most valuable tool is a technical manual from a reputable publisher like Chilton or Bentley. Skip it, and you’re guessing. Guessing leads to bent valves.
Removing the Old Timing Belt
Ready to start? If you have moderate engine knowledge, you can handle this. Give yourself about eight hours. Rushing causes mistakes.
Follow these general steps to remove the old belt. Always defer to your specific service manual for safety procedures.
- Engage the emergency brake.
- Jack up the car and secure it on jack stands.
- Disconnect the negative battery terminal.
- Ensure the transmission is in neutral.
- Remove all spark plugs.
- Take off plastic engine shields.
- Drain the coolant.
- Remove the cooling fan and plastic covers. Note: These often have reverse threads. Turn right to loosen.
- Disconnect cooling hoses. Label them for reassembly.
- Remove the radiator.
- Remove engine drive belts.
- Remove the cap and rotor.
- Remove the water pump pulley.
- Remove bolts holding the upper timing belt cover.
- Place a socket on the crankshaft pulley center. Rotate the engine to Top Dead Center (TDC). This is where the first piston is at its highest point. Align the marks on the pulley and engine block.
- Loosen and remove crankshaft pulley bolts. Take off the pulley and vibration damper.
- Remove the lower timing belt cover.
- Mark the main tensioner bolt location.
- Remove the tensioner bolt and timing belt cover.
- Remove the main adjustment bolt for the tensioner.
- Remove the tensioner and its spring.
- The belt should now slide off.
You’ve cleared the old hardware. Now you’re halfway there. Next comes installing the new belt, setting tension, and lining up timing marks.
Timing Chain vs. Timing Belt
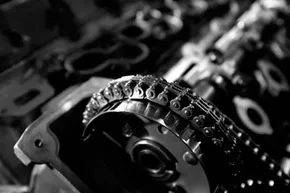
Check your engine first. You might not have a belt at all. Many modern cars use a timing chain.
Chains and belts both synchronize the crankshaft and camshaft. Chains are currently winning the popularity contest. Why? They often last the life of the engine and require no scheduled maintenance.
But chains aren’t perfect. They stretch over time. They are heavier. They are noisier. And if they fail, repair costs are higher. Belts are cheaper to replace but have a finite lifespan. Chains are heavier but theoretically durable.
Which one does your car need? Check your manual. The maintenance implications are vastly different.
Setting the Timing Marks and Tension
The old belt survived for years. It kept the pistons and valves from clashing. To give the new one a fair shot, you have to be deliberate. Rushing is the fastest way to ruin an engine. Dan Trottier, a tech at Bob’s Auto Service Inc. in Saco, Maine, puts it simply. Take your time. Move at your own pace.
Your service manual holds the blueprints. The general workflow for attaching a new timing belt usually looks like this:
- Reset the engine to top dead center (TDC). This makes spotting timing marks easier.
- Mount the new belt and tensioner. Align the marks as you go.
- Adjust the tension.
- Double-check every timing mark.
- Reassemble in reverse order.
Two steps need your full attention. Tension and alignment. Get them wrong and you get a broken engine.
Think of tension like a bandage. Too tight and it chokes the bearing. Too loose and it skips teeth. A skipped tooth means the camshaft and crankshaft fall out of sync. The pistons hit the valves. That is a catastrophic failure. You need the sweet spot. Refer to your technical manual for exact specs. There is no guesswork here.
Alignment is just as critical. It is like setting a watch. If the hands are off by a minute, you are late. If the timing is off by a fraction of a degree, the engine runs poorly. Worse, it risks damage. Locate the specific marks on your engine. Verify them against the manual. Then put the covers back on.
Once the hood is closed, the new belt takes the lead. It keeps the engine in tempo. You can drive with confidence. The players will stay in time.
Critical Tips for a Clean Install
Buying the right part is step one. Ensure the new belt matches the original exactly. Match the tooth profile. Match the shape. Match the length and width. Match the material. A near-miss is a fail.
Do not force it. Never stretch or pry the belt over the pulleys. Wiggle it into place. Use patience, not force. If you bang on parts, you risk micro-fractures in aluminum components. Treat the engine like a Swiss watch.
Follow the manual. Use the correct lubricants and materials. Bring in a helper. A second set of eyes helps catch misaligned marks. Timing is subtle. Mistakes are easy to make when you are alone.
There is one more move to consider. Replace the water pump. You have the area exposed. It is exposed now because you removed the old belt. Doing it now saves labor later. It is more cost-effective to replace both while the guts are visible.
The job is done. The engine is timed.
Where to Dig Deeper Into Timing Systems
If the mechanical dance of the camshaft and crankshaft has you intrigued, there is a wealth of technical literature waiting. You do not have to stop at the basics. The industry is saturated with detailed breakdowns on how these systems evolved from simple chains to complex, computer-controlled belts.
For a broader perspective, look into the crossover between track performance and street legality. Articles detailing the top 10 everyday car technologies that came from racing reveal how F1 innovations trickle down to your daily commuter. Curious about the absolute peak of internal combustion? Reading how hypercars work shows why timing precision is non-negotiable at 200 mph.
The Digital and Physical Connection
Modern engines are not just metal; they are code. You might wonder what makes a digital car digital. The answer lies in the sensors feeding data to the ECU, which adjusts timing by milliseconds. This intersects with how car computers work, creating a feedback loop that replaces the old-school mechanical governor.
Meanwhile, the physical reality of moving these machines raises different questions. How auto transport works is a logistics puzzle, especially when dealing with high-value builds that cannot be driven on public roads. And for those asking can you assemble your own car, the timing system is often the most critical component to get right before the first start.
Maintenance Myths and Future Costs
Synthetic oil technology has changed the game for lubrication, but it does not cure a stretched timing chain. As what’s new in synthetic oil technology advances, mechanics are still debating whether modern fluids can extend belt life significantly. The reality? Most manufacturers still insist on strict interval changes.
This brings us to a darker question: will car repairs in the future financially cripple you? When a timing belt snaps on an interference engine, the repair bill often exceeds the vehicle’s value. The cost of labor alone for a BMW E30 timing belt replacement or similar complex overhead cam jobs highlights why preventive maintenance is cheaper than catastrophic failure.
Sources and Further Reading
The technical consensus relies on a mix of ASE-certified technician insights and historical data.
- Carley, Larry. “Timing Chains & Gears.” Engine Builder. Oct. 1, 2007.
- Carley, Larry. “Web Exclusive: Gearing Up for Timing Belt and Chain Work.” Tomorrow’s Technician. March 27, 2009.
- Carley, Larry. “What Goes Wrong With Cars and When.” AA1Car Auto Diagnosis Repair Help. 2009.
- Carollo, John. “Timing Chain Selection: And a look at ‘new’ and ‘how to.'” Engine Builder. June 1, 2006.
- Car Talk. “Timing Belt/Camshaft Drive Belt.” March 31, 2005.
- Ciulla, Vincent. “DIY: Replace Your Timing Belt.” All Info About Auto Repairs.
- Dempsey, Wayne R. “BMW E30 Timing Belt Replacement.” Pelican Parts.
- Goss Pat. “Timing Belts.” MotorWeek Goss’ Garage. Season 21.
- Goss, Pat. “Timing Belt Trivia.” MotorWeek Goss’ Garage. Season 27.
- Harler, Curt. “Proper Timing Tips to Get Under Your Belt.” Automotive Service Association. Jan. 20, 1998.
- Juran, Kim. “Replacing a Timing Belt: Saturday Mechanic.” Popular Mechanics. March 2007.
- Ofria, Charles. “A Short Course on Automobile Engines.” Family Car Parts.
- Torbjornsen, Tom. “Importance of Timing Belts.” America’s Car Show.
- Trottier, Dan. Technician With ASE Certification at Bob’s Auto Service Inc. in Saco, Maine. Personal correspondence and interview. Nov. 1-3, 2009.