That piercing shriek isn’t coming from the pedestrian you almost hit. It’s coming from your rotors.
If your brakes are screaming when you stop, the friction material is likely gone. You need new brake pads. This is routine maintenance, not a catastrophic failure. But ignoring it will ruin your rotors. And rotors are more expensive than pads.
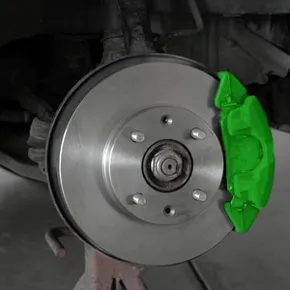
Brakes work by converting kinetic energy into heat through friction. In a disc brake system, calipers squeeze pads against a spinning rotor. The friction slows the wheel. Eventually, the pads wear down to nothing. That’s when you hear the squeal. It’s a warning.
Before you strip everything apart, assess the damage.
Зміст
Assessing Your Brake Condition
Most late-model cars put disc brakes on the front wheels. Drum brakes are still common on the rear. Disc brakes are more efficient and reduce stopping distances. They handle about 90 percent of the braking force. Manufacturers save money by using drums in the back. But for relining, you’re likely working on the fronts.
Lift the car. Remove the wheel. Look through the inspection gap in the caliper.
Measure the remaining brake pad material.
- If it’s less than 1/4 inch, replace the pads.
- If it’s less than 1/8 inch, hurry. You’re dangerously close to metal-on-metal contact. This can gouge the rotor. Fixing a scored rotor means machining or replacing it entirely.
Check the rotor thickness. Look up the minimum specification in your owner’s manual. Thinner rotors overheat faster and lose stopping power. If the rotor is at or below the max wear limit, replace it.
Inspect for damage. Look for:
– Deep gouges or grooves
– Warping
– Cracks
– Uneven surface wear
– Thickness variations (use a micrometer if you have one)
If the rotor is damaged but still thick enough, a mechanic can “turn” it. That’s machining a thin layer off to create a smooth surface. But if you’re already doing the work, new rotors might be cheaper than paying for labor to machine old ones.
Consider the calipers too. They’re hydraulic. Seals leak. Corrosion builds up. If you’re already disassembling the brakes, inspect the caliper slides. Grease them. If they’re seized, replace the caliper.
Compromised brakes reduce fuel efficiency. They increase stopping distances. They’re a safety hazard.
Tools You’ll Need
You don’t need a professional shop setup. You need the right tools. Don’t cheap out. Bad tools break. Broken tools cause accidents.
Essential Tools:
– Jack and jack stands or a floor jack. Never work under a car supported only by a hydraulic jack. It can fail. You need solid support.
– Tire iron or socket set to remove wheels.
– Brake pad grease (caliper slide grease). Not regular grease. It’s designed for high heat and metal-to-metal contact.
– New brake pads. Make sure they match your vehicle’s make and model.
Helpful Extras:
– C-clamp or brake piston tool. You’ll need to compress the caliper piston to fit the new, thicker pads.
– Heavy-duty gloves. Brake dust is nasty. It contains heavy metals and asbestos in older cars. Don’t breathe it. Don’t touch it with bare skin.
– Dust mask. Brake dust is an inhalation hazard.
– Micrometer. For measuring rotor thickness and wear.
– Plastic cups and Sharpie. Labeling bolts prevents confusion. Disc brakes have many fasteners. Mixing them up leads to problems.
Why Front Brakes Matter More
You might wonder why manufacturers don’t put disc brakes on all four wheels. Cost, primarily. Drum brakes are cheaper to make. But they’re also less effective at dissipating heat.
The front brakes do the heavy lifting. When you brake, weight transfers forward. The front tires grip harder. The front brakes handle most of the deceleration. That’s why you’re likely relining the front pads first.
If your rear wheels have drums, the process is different. But for disc brakes, the principle is the same. Friction pads wear out. You replace them.
The Danger of Delay
Some people wait until the brakes fail completely. Don’t do that.
Driving on worn pads grinds metal against metal. The caliper pushes the piston back into the brake fluid. If you ignore the wear, the pads disappear. The metal backing plate contacts the rotor. You scratch the rotor. You lose braking power. You risk an accident.
If the squeal is loud, stop driving. Walk to the shop. Tow it. Don’t risk it.
Once you’ve confirmed the pads are dead and the rotors are in decent shape, you’re ready to start. You need to remove the old pads.
That’s the next step. But first, make sure your car is secure. If it isn’t, nothing else matters.
Clearing the Debris
Park the vehicle. Engage the parking brake. Jack up the front end. If you drove the car to the shop, the engine bay is likely hot enough to blister skin. Ignore that and you’ll regret it.
Slip off a front wheel. Use your tire iron or a spinner for speed. The caliper comes off next. You’ll need to undo the bolts. Keep them organized. Dumping them in a random pile is a recipe for mixing up the mounting hardware and stripping threads. Slide the caliper off the rotor.
The brake pads sit inside the caliper bracket. Depending on the model, they’re held by bolts, springs, or simple clips. Undo the fasteners.
New pads are thicker. Old ones are worn down. You need to push the caliper piston back into its housing to make room. If you try to force new pads onto a fully extended piston, nothing fits. Push the piston in. Use your bare hands if it’s loose. If it resists, grab a pair of vise grips or channel locks. Be careful. You can also use a C-clamp. Tuck the jaws inside the caliper body, not on the piston face, to avoid scoring the metal. Turn the clamp to compress the piston.
“A too-tight piston may signal caliper problems.”
Pushing the piston back forces brake fluid up the line. It has to go somewhere. Pros drain the reservoir first. If you skip that step, watch the fluid level. It will rise. It might overflow. If it spills on your paint, it eats the clear coat.
If you’re swapping rotors too, do it now.
Before dropping the new pads in, apply brake pad grease. Coat the back of the pad—the side facing away from the rotor. This prevents squeal and helps the pads slide in and out of the bracket. You’re halfway there.
Inspecting While You Work
Look at the caliper while you have it off. Is it corroded? Leaking fluid? Calipers have a lifespan. A sticky or failing caliper leads to uneven braking, warped rotors, and poor fuel economy. If the caliper looks rough, replace it. If it looks clean and moves freely, you might be fine. Don’t replace parts that aren’t broken unless you want to spend more money.
Reassembly and Burnishing
Slide the new pads into the bracket. Reattach the clips and bolts. Tighten them uniformly. Uneven tension causes vibration. It also accelerates rotor wear.
Put the caliper back on the rotor. Secure it.
Repeat for the other side.
Put the wheels back on.
Now, get on the road. You need to burnish the new pads. Burnishing isn’t just breaking them in. It’s about transferring the friction material evenly to the rotor surface. Heat is required. Too much heat too soon ruins the process. Too little heat means poor stopping power.
If you drained fluid from the reservoir, refill it. Some mechanics change the whole system’s fluid here. Reusing the old fluid isn’t fatal, but fresh fluid is safer.
Avoid sudden stops. Don’t brake hard until the pads are seasoned. Drive on an empty road. Leave extra stopping distance. You’re testing the brakes. Hope they work, but prepare for them not to.
Here is the burnishing sequence:
- Accelerate gradually to 45 mph.
- Brake gradually until you’re at 5 mph.
- Hold that speed for about a minute.
- Accelerate back to 45 mph.
- Brake back down to 5 mph.
Repeat this cycle at least ten times.
Listen as you drive. Some squealing is normal. The pads are adjusting. If the noise persists after burnishing, check your work. Are the clips tight? Is the grease applied correctly?
The science behind burnishing is simple. Friction pads contain resins. Heat releases them. These resins migrate to the surface of the pad. That’s where they create the best friction interface with the rotor. Without heat, the resins stay locked in the compound. The brakes won’t bite.
Beyond the Pad: Knowing When to Stop
Most people treat brake jobs like oil changes. You pay, you wait, you drive away. But brakes are the only safety system that relies entirely on friction and heat management to keep you from becoming a crumple zone. Ignoring the nuances of brake maintenance doesn’t just wear out parts. It risks your life.
If you’ve replaced pads but still hear a high-pitched squeal or feel a pulsing pedal, the issue isn’t always the friction material. It’s often the interface between the pad and the metal.
“Is it always necessary to resurface the rotors and drums when the brakes are relined?”
The answer is no. But assuming it is a waste of money. Assuming it isn’t a waste of time.
Rotors don’t need machining unless they’re warped, scored, or below the minimum thickness spec. Modern rotors are often treated to resist corrosion. Sanding them down strips that coating. You might fix the noise today only to have rust bloom within a year.
Check the thickness. Use a micrometer. If the rotor is within spec and visually clean, skip the resurfacing. Install fresh pads. Bed them in properly. Done.
But if the pedal shudders at highway speeds? That’s warp. Or uneven depositing of pad material. In that case, resurfacing—or replacing—is non-negotiable.
The Caliper Conundrum
Calipers are the muscle. Pads are the hand. If the muscle is weak, the hand won’t matter.
A sticking caliper piston is the silent killer of brake systems. It causes uneven wear. It generates excess heat. It can lead to brake fade. Check for free movement. Clean the guide pins. Grease them with high-temp silicone. If the caliper won’t slide, replace it.
Don’t rebuild unless you have the tools and the know-how. Seals fail. Bores corrode. It’s often cheaper and safer to swap in a remanufactured unit.
Where to Turn for Answers
When you’re unsure, don’t guess. Use resources.
The U.S. National Transportation Safety Board (NTSB) publishes detailed accident reports. Look up brake-related incidents. See what they cite. Fatigue? Overheating? Poor maintenance?
The U.S. Department of Transportation (DOT) sets standards. Their guidelines on brake performance are rigorous. But they don’t tell you how to do the job in your driveway.
For specific repair questions, Yahoo! Autos archives have decades of technician advice. Questions like “What parts are generally replaced during a brake job?” or “How can I tell if a rotor really needs replacement?” are answered by seasoned pros.
Edmunds.com offers step-by-step guides. Scott Memmer’s breakdown of pad replacement is clear. It assumes basic tool knowledge. It doesn’t hold your hand. Good.
The Source Material
For deeper technical dives, look to Wingate Brake and Steering Centre. Their “Brake Noise Diagnosis” guide breaks down the acoustic feedback. Squeal vs. grind vs. rumble. Each means something different.
Leonard C. Buckman’s Commercial Vehicle Braking Systems covers the heavy end. Disc brake relining in trucks is different. Heat dissipation is bigger. Materials